
Dividing an application in N layers is considered a standard and a best practice. It is often thought that this automatically creates a decoupled application. However, just creating layers doesn’t make your code loosely coupled.
A typical N-layer application
Let’s take a simple layered application:
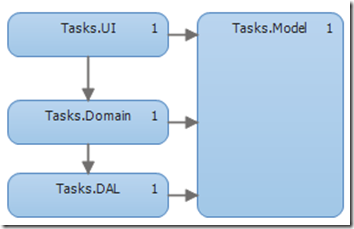
1. A typical N-layer architecture
In the above image you can see how the application is structured. The responsibilities for every layer are:
- UI layer: This can be a WPF-app, a console-app, a web application, etc. It defines the user interface and no logic should be in this layer.
- Domain Layer: It coordinates the interactions between UI, Model and DAL. It includes classes such as TaskService.
- DAL: Responsible for saving and retrieving stored instances. A typical class would be a TaskRepository.
- Model: A layer that spans all three layers. This usually consists of POCO-objects. The Task-class is an example.
One might think that separating the application into these layers guarantees loose coupling. In a few moments I’ll show you why that’s not necessarily true. First, let’s look at how these layers are usually tied together, from the bottom up:
Model
This layer holds the basic entities. This is the Task-entity, a simple POCO-class:
public class Task
{
    public int ID {get; set;}
    public string Name { get; set; }
    public string Description { get; set; }
    public DateTime DueDate { get; set; }
}
DAL
In the Data Access Layer typically there’s a repository class which allows access to the underlying data store. In this example, I will be using Entity Framework. The actual technology is not important, you could swap it out with whatever data storage technique you’re using. I chose Entity Framework because it makes the code samples very concise. The repository has two methods: one to retrieve a Task by ID and another one which accepts an arbitrary where-clause.
public class TaskRepository : DbContext
{
    DbSet<Task> Tasks { get; set; }
    public Task Find(int ID) =>
        Tasks.Find(ID);

    public IEnumerable<Task> Find(Func<Task, bool> where) =>
        return Tasks.Where(where);
}
Domain
The domain ties together all the other layers. For the tasks we have a TaskService This class exposes a method to retrieve all Tasks that are due today:
public class TaskService
{
    TaskRepository repo;
    public TaskService() =>
        repo = new TaskRepository();

    public List<Task> GetAllDueTasks()  =>
        repo.find(task => task.DueDate.Date == DateTime.Today).ToList();
}
UI Layer
For the UI layer I chose an ASP.NET MVC application. I chose this because it makes the example represent a real-world scenario more closely. I will not enter into detail on how MVC works, I will only show you the controller part. If you don’t know MVC, for now you can just assume that the controller handles an HTTP-request. Let’s see what the controller does in order to visualize the tasks that are due today:
public class TaskController : Controller
{
    public ActionResult DueTasks()
    {
        TaskService service = new TaskService();
        var duetasks = service.GetAllDueTasks();
        return View(duetasks);
    }
}
Result
The above structure is very typical and by some considered a best practice. However, there are a few problems. Let’s take a look at figure 1 again and examine the dependency graph. You can see that all the dependencies point downward. Now, let’s see whether the current dependency graph is desirable.
One of the principles of loose coupling is that you need to be able to use each component in isolation. Is this possible for all our components?
Certainly, you would need to develop alternatives for their dependencies, but this should be doable without modifying the existing component. So let’s take a look at each component:
- User Interface: With the current dependency graph, it certainly is possible to swap out the UI for another one. We just create a new project (WPF, Console, …), add references to Domain and Model and we are good to go. We didn’t need to modify existing code. So far, the dependency graph is OK.
- Domain and Model: Swapping out these layers doesn’t really make sense. Since it’s the core of the project, swapping it out would basically mean creating a new project.
- DAL: Replacing a DAL is typically why people advocate loose coupling. (“What if need to switch Database providers?”) Although this usually doesn’t happen, it still is a good practice to decouple the Domain from the DAL. If we remove the DAL from the solution, we will run into a problem. The problem is that our Domain-layer has a hard reference to our TaskRepository. If we want to swap out the DAL, we’ll have to modify the Domain-layer.
N-layer application with basic Dependency Injection
Ideally, what we want is that the domain-layer and the model-layer have no hard dependencies. They should be able to use external facilities, but they should have no knowledge of how those facilities handle requests, they should only know what they do.
This is a basic example of a more desirable dependency graph:
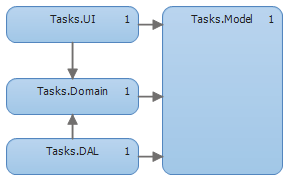
2. Inverted dependency graph
As you can see, there’s a slight but important difference: the dependency between the Domain and the DAL has been inverted. Looking at this graph, you can see that now you could swap out the DAL without touching the domain layer.
Now how can we achieve this graph?
Implementing the graph
Implementing the graph is quite easy:
- Remove the reference from Domain to DAL
- Create a reference from DAL to domain
This will cause compiler errors of course. The TaskService has a reference to TaskRepository but since the domain has no reference to the DAL, we receive a compiler error. We need to invert the dependency*. *
Inverting the dependency
To invert the dependency we will execute the following steps:
- Create an interface which describes the public interface of a repository
- Let the TaskRepository implement this interface
- Make sure TaskService references only the Interface
- Pass an object that implements the IRepository interface to the TaskService
Since we still need to be able to access the repository, we need to define an Interface in the Domain-layer which defines what a Repository can do:
public interface ITaskRepository
{
    Task Find(int ID);
    IEnumerable<Task> Find(Func<Task, bool> where)
}
Now we can modify the TaskRepository to implement this Interface:
public class TaskRepository : DbContext, ITaskRepository
{
    DbSet<Task> Tasks { get; set; }
    public Task Find(int ID) =>
        return Tasks.Find(ID);

    public IEnumerable<Task> Find(Func<Task, bool> where) =>
        Tasks.Where(where);
}
TaskService had a hard reference to the TaskRepository. Let’s remove this dependency and replace it with the interface:
public class TaskService
{
    ITaskRepository repo;
    public TaskService(ITaskRepository repository) =>
        repo = repository;

    public List<Task> GetAllDueTasks =>
        repo.Find(task => task.DueDate.Date == DateTime.Today).ToList();
}
Now we are passing an object into the constructor, which must implement the ITaskRepository interface. This is known as Constructor Injection. This is necessary because we don’t want a reference to any specific repository.
This of course affects the UI layer, because now the TaskService does not have a default constructor anymore. To overcome this problem, let’s apply the same steps:
Create an interface:
public interface ITaskService
{
    List<Task> GetAllDueTasks();
}
Inject it into the constructor of the controller:
public class TaskController : Controller
{
    ITaskService service;
    public TaskController(ITaskService taskservice) =>
        service = taskservice;

    public ActionResult DueTasks() =>
        View(service.GetAllDueTasks());
}
Now, the TaskRepository, the TaskService and the TaskController are completely decoupled from each other and only depend on interfaces.
Looking at the current state of the code, you might ask what the real benefit is. After all, there’s still a dependency on the TaskRepository when we want to construct the *TaskController, *we just moved it to the top of the application.
The benefit is exactly this, instead of having implicit dependencies in the entire application we can now push all the dependencies into one single place and manage them all from a centralized location. This location is usually referred to as the Composition Root. Thinking in terms of the **Single Responsibility Principle ** (every class should have a single responsibility), you could say that we moved the responsibility for managing their dependencies from the TaskController and the *TaskService *to another, dedicated class.
Apart from that, we’re also enabling unit tests, we can now create fakes and pass them to the TaskController or the TaskService and test them in isolation.
Implementing the composition root
With everything decoupled, we do need a way of coupling these items at runtime. At runtime, an interface doesn’t do anything for you, so we need a concrete implementations.
First I will show a simple (hard coded) implementation.
In this case, since we’re using ASP.NET MVC as the UI application, the construction of the controller will be handled by the framework itself. Using the default configuration, MVC will look for a controller with the name specified in the URL like this:
/{controller}/{action}
This means that accessing the URL /Task/DueTasks will execute the method we specified. By default, it will try to use the default constructor. In our case, there isn’t any default available and this will fail. To solve this, we need to plug into the framework by creating a new ControllerFactory:
public class MyControllerFact : DefaultControllerFactory
{
    public override IController CreateController(System.Web.Routing.RequestContext requestContext, string controllerName)
    {
        if (controllerName == "Task")
            return new TaskController(new TaskService(new TaskRepository()));
        else
            return null;
    }
}
The framework already helps us by parsing the URL and passing the necessary information. Then, instead of letting it handle the construction, we plug in our own implementation. MVC gives us the name of the controller it wants and then lets us decide how we want to construct it. The given implementation is a very crude one and should not be used in a real-world scenario. I’m showing it here so you can see that the dependencies are resolved in a single place. This is the Composition Root.
For completeness sake,I’m also showing you how to plug this class into the MVC framework. You need to register it inside the Application_Start event in the global.asax-file:
protected void Application_Start()
{
    ControllerBuilder.Current.SetControllerFactory(new MyControllerFact());
}
As mentioned before, the benefit is that we are moving the burden of managing dependencies from the classes inside the application towards a centralized class. Replacing the DAL now only requires us to create a new DAL and modify the Composition Root. In this small example, the benefits may not be that obvious, but that’s because we only have a few classes. If you extrapolate this to a complete application, the benefits get a lot more obvious.
Using a DI container
The implementation that I showed in the previous section is admittedly not a very good one. It means that for every controller and dependency you add, you’d have to modify the MyControllerFact, which is not a very maintainable solution. Therefore, I will show you an implementation with a DI Container. A DI Container is a reusable component that provides dependency functionality. There are two steps to using a container:
- Configuring the container
- Using the container to resolve dependencies
In the next example I’m going to use the Ninject DI Container. If you want to use a different container you will need to look up the specific API.
Configuring the container
In the configuration step, you basically tell the container what object to construct when asked for a specific interface:
IKernel container = new StandardKernel();
container.Bind<ITaskRepository>().To<TaskRepository>();
container.Bind<ITaskService>().To<TaskService>();
container.Bind<TaskController>().ToSelf();
Here you can see that we tell the container which types it needs to construct when asked for a certain interface.
Using the container to resolve dependencies
Now we can adapt the MyControllerFact to use the container to create controllers:
public class ControllerFact : DefaultControllerFactory
{
    public override IController CreateController(System.Web.Routing.RequestContext requestContext, string controllerName)
    {
        var controllertype = this.GetControllerType(requestContext, controllerName);
        return (IController)container.Get(controllertype);
    }
}
Other features of DI Containers
Apart from resolving dependencies, a DI Container offers a lot more features. Which features are supported depends on the container you choose:
- Lifetime management: when configuring the container, you can specify whether to create a new instance or to return the same instance every time. Different containers can have more possibilities (such as one per request or custom lifetimes)
- Configuration: In this example I showed how to configure the container with the Fluent API. This requires you to recompile the application if you want change the configuration. Some DI containers offer XML configuration or even a combination of both. That way you don’t need to recompile if you want to swap out certain modules.
- Auto-registration: Closely related to configuration is auto-registration. In the previous example we had to explicitly tell the container which concrete implementation goes with which interface. Auto-registration allows you to do this mapping with convention over configuration. If there’s no concrete class bound, then check if we can find a class that follows a set of conventions.
- Interception: Since the DI container knows the interfaces, it could possibly wrap the interfaces and intercept all the calls. This can be useful for solving cross-cutting concerns such as logging and security. The concept is the same as an AOP (Aspect Oriented Programming) framework such as PostSharp. The difference is that with a DI container this is a dynamic feature, whereas PostSharp uses post-compilation steps. Interception with DI containers is much more flexible, because it allows you to modify cross cutting concerns at runtime or even through configuration.
Conclusion
Even when using distinct layers it’s very easy to fall into the trap of writing tightly coupled code. Furthermore, the latest IDE’s (such as Visual Studio) are really excellent. This also means that they enable you to create dependencies very easily. In order to avoid this, you should always consider that you’re creating a hard reference when performing either one of the following two actions:
- Using the new-keyword to create an instance
- Adding a reference to another library
As a mental rule, I always force myself to think whether it’s really necessary and if there’s an alternative when I want to do either of these actions.
Note: the ideas expressed in this post are loosely based on the introduction from the book “Dependency Injection in .NET” by Mark Seemann. If you want to learn more about Dependency Injection, I would recommend you read this book. It is an amazing source of information, well written and it covers the ins and outs of Dependency Injection as well as several DI Containers.