
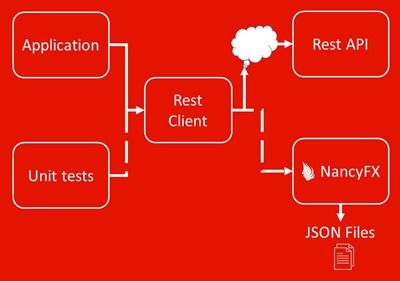

With the proliferation of REST API’s, external ones and internal ones (think microservices), we very often find ourselves depending on these external services in our applications. Usually we have some designated class in front of the access to such a REST API. That class takes care of authentication, serialization and other plumbing. Testing this part of the application is a bit difficult though. Often it gets left out.In this post I’ll show how you can create an in-memory web server by using a NancyFX module so you can simulate the API’s responses and you can test all the details of the connection.
Set up
To set this up we need two components:
- The host that will serve our fake web app
- The fake web application
To be clear: Only the test project uses NancyFX, it’s not necessary to use NancyFX as your web framework.
1. The host
In your test project you will need the package Nancy.Hosting.Self . This package allows you to run a web server in-memory. The following code shows how to create a host (and how to dispose of it):
public class Host : IDisposable { NancyHost _host; public Host() { _host = new NancyHost(new HostConfiguration { RewriteLocalhost = false }, new Uri("http://localhost:50001")); _host.Start(); } public void Dispose() { _host.Stop(); _host = null; } }
Important to note here is the RewriteLocalhost option in the HostConfiguration. This value determines whether localhost-url’s are rewritten to http://+:port/ style URL’s to allow for listening on all ports. If you do this, you either need a namespace registration or admin access. Since we want our tests to be independent to the environment we need to disable it. The default value is true, so we explicitly set it to false. For more information, check the NancyFX documentation
We can use this class now in our unit tests. Since it’s a rather expensive operation (we want our unit tests to by lightning fast, see key qualities of a good unit test), I tend to set it up only once per test run. The following shows how to set it up once for a test run in xUnit. For this particular case (shared context between multiple test classes), we need to use collection fixtures:
[CollectionDefinition("Host")]
public class HostCollection: ICollectionFixture<Host> { }
This class is a marker class that will allows us to group classes in a collection. It will construct the host before the first test in the collection is executed and will dispose of it after the last test in the collection finishes. Once we have this marker class, we can declare the tests that rely on the host as follows:
[Collection("Host")] public class RestClientTests
{
    // …
}

Different testing frameworks have different methods of setting up shared contexts, so this can be different depending on the framework you’re using.

### 2. The fake web application

Now that we have an in-memory server, we can start building our fake we application that will respond to our web requests. A Nancy web app is a fairly simple module:
``` csharp
public class FakeApp : NancyModule
{
    public FakeApp()
    {
        Get["/products/{id}"] = _ => Response.AsJson(new Product());
    }
}
You can have multiple classes inside your test project that inherit from NancyModule. You apply the route to any of the HTTP methods in the constructor to emulate the REST API and then return the values the API would normally return.
Tying it together
Now that we have an in-memory web server and a fake web app, we can use it to test our REST client.
Suppose we have the following REST client (our system under test):
public class RestClient
{
    IRestClient _client;
    public RestClient(string url)
    {
        _client = new RestClient(url);
    }

    public Product GetProductById(int id)
    {
        return _client.Get<Product>(new RestRequest($"/products/{id}")).Data;
    }
}

In this example, I’m using RestSharp, but this would work with WebClient, HttpClient or any other library.

To test this class, we can write the following test:
``` csharp
[Collection("Host")] public class RestClientTests
{
    [Fact]
    public void When_getting_a_product_it_correctly_deserializes_it()
    {
        new RestClient("http://localhost:50001").GetProductById(1).ShouldNotBeNull();
    }
}
The Collection-attribute ensures that our host is up and our fake app is running. By passing in the local URL, we make sure that we target the correct URL so it targets our fake web application.
Improving our fake app
To be able to run some more interesting tests, we need to make sure that our fake web app emulates the REST API as much as possible. We don’t want to spend too much time replicating the real API so I’ve come up with an implementation that allows us to match URL’s with predefined JSON responses. To do this we will store canned JSON responses as files in the assembly and then use a convention to match routes to those responses.
To add a JSON-file to your assembly, add a new file with the .json-extension and set the Build Action to Embedded Resource in the properties.
Now we’ll match routes with these predefined responses:
Instead of defining various routes for all the API’s operations, we will now define only one. Based on the route that this method was called with we will retrieve the JSON from the assembly’s resources and then return that result:
// Use a greedy route
Get[@"/{route*}"] = _ => {
    // 1. Read the url and replace all dashes with dots
    var resourcePath = _.route.ToString().Replace("/", ".");
    // 2. Combine the filename with the path of the assembly and the directory
    var resourceName = $"<assemblyname>.<directory>.{resourcePath}.json";
    // 3. Read the content of the json file Response response;
    using (var stream = Assembly.GetExecutingAssembly()
                                .GetManifestResourceStream(resourceName))
        using (var reader = new StreamReader(stream))
            response = reader.ReadToEnd();
    // 4. Set the content type as JSON and return the response
    response.ContentType = "application/json";
    return response;
};
This method consists of 4 parts:
- First we get the route that the method was called with. We replace all slashes with dots (see the next step for why this is important).
- Then we translate this path into a path to a resource. To read a resource you have to specify the path to it in the format displayed above. If you have directories they should be separated with dots instead of slashes. This allows us to match routes with a directory structure.
- Next we read the content of the file and (implicitly) cast it to a NancyFX Response.
- Lastly, we set the content-type and return it.
With this in place, we don’t have to modify the server anymore. We can now add responses based on routes. As an example we can simulate the responses to the following routes, by creating the directory structure below:
- /products/{id}
- /deals/{id}
- /deals/{id}/products - deals - 1994 -> products.json // matches /deals/1994/products -> 1994.json // matches /deals/1994 -> 2441.json // matches /deals/2441 - products -> 4245.json // matches /products/4245
The above method only works for GET-requests, but you could devise a similar strategy for other HTTP methods as well.
Conclusion
With a bit of infrastructure code, which is reusable across projects, we can set up a quick way of testing our REST clients.
In this post I showed a basic infrastructure set up and some improvements to make working with the fake application easier. There are still more improvements to make, such as a mechanism to match POST requests with canned responses, setting response headers and status codes and the ability to look into our test server to see what was sent to it.